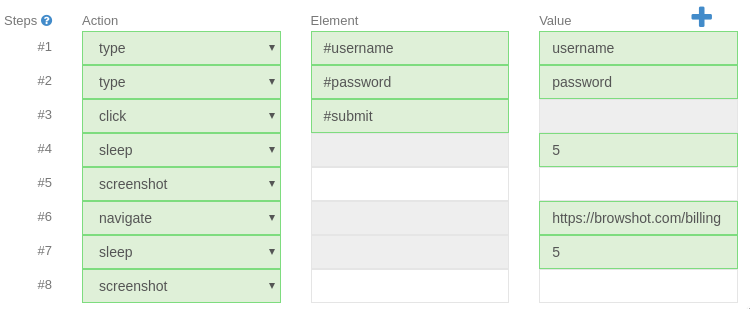
Rich browser interactions with automation steps
 With Browshot, you can inject JavaScript into any page to log in, click on elements, etc. To expand the range of possible interactions and simplify them, we have added automation steps. These steps are available with the latest API.
On this blog, we will post several examples using automation steps, including:
- Complex login to a website
- Hide a cookie notice or banner
- Take screenshots of a carousel with all the elements
- Select multiple elements in a page
Automation steps
The automation steps describe the list of commands that the browser must execute. Unlike the injected JavaScript, these steps can be carried out over multiple pages and generate multiple screenshots. Each step contains:
- a command:
- type: type text, like a username or password
- click: click on an element
- javascript: execute and JavaScript
- sleep: wait for a number of seconds
- navigate: navigate to a new URL
- screenshot: take a screenshot of the current screen, page, or specific element
- for: beginning of for loop
- end: end of for loop
- element (optional): a CSS selector targeted by the command, for example, the input field to type a username, the element to click on, etc.
- value (optional): the number of seconds to sleep, the text to type, the URL to navigate to, or the JavaScript code to execute
The examples are described in JSON format, in a JSON array (even if there is a single step). Here are some examples of steps:
[
  {"command": "click", "element": "#login"},
  {"command": "type", "element": "#username", "value":"username@mail.com"},
  {"command": "type", "element": "#password", "value":"PASSWORD"},
  {"command": "click", "element": "#submit"},
  {"command": "sleep", "value": "2"},
  {"command": "navigate", "value": "https://mysite.com/dashboard"},
  {"command": "sleep", "value": "5"},
  {"command": "screenshot"},
]
For loop
You can iterate over multiple elements by using the for ... end loop. For example, click on elements and take a screenshot of them:
[
    {"command": "for", "element": "<N>", "value": "1..100"},
    {"command": "click", "element": "#foo > li:nth-child(<N>)"},
    {"command": "screenshot"},
    {"command": "end"}
  ]
The for loop defines the variable <N> with the values 1 to 100. In each loop, the browser clicks on the Nth li element and takes a screenshot.
This loop will stop after N = 100, or when the element to click on is not found. For example, if they are 5 elements, the loop will stop when N = 6.
You can define any name for the variable. <N> is used by default. The default value is 1..100.
API call
Use the API call argument steps=[...] to the screenshot/create API call. The steps must be encoded as a URL, like any other argument. The encoding is done automatically if you use any of the libraries we provide. Remember that even if you have only one step, it must be included in a JSON array. You can also try the automation steps in your dashboard.

Note: The automation must be completed within the delay specified by the API. You should set the delay to 30 seconds (delay=30), which is the maximum delay authorized today. You will get an extra 30 seconds per screenshot, up to 5 minutes in total. For example, if you take one screenshot, all your automation steps must be completed within 30 seconds of the initial page load. If you take three screenshots, all the steps must be completed within 90 seconds.
Cost
The first screenshot costs one credit for desktop browsers and two credits for mobile devices. Additional screenshots cost one credit.
Deprecating multiple shots
Automation steps are a better way to take multiple screenshots. The shots and shot_interval options are deprecated and will be removed soon.
Don't hesitate to contact us if you need help with the automation steps.
